Cam Chain Tensioner Extenders
Tim (Snake) Acree (RIP)
The reason is mysterious but it seems one of the first things to give any trouble on
Vulcan 1500/1600 engines is the cam chain tensioner. That's the spring
loaded gizmo that keeps an idler pressed against the chain so it doesn't whip or come off the sprocket or even
make nasty grinding noises as it stretches through normal use. 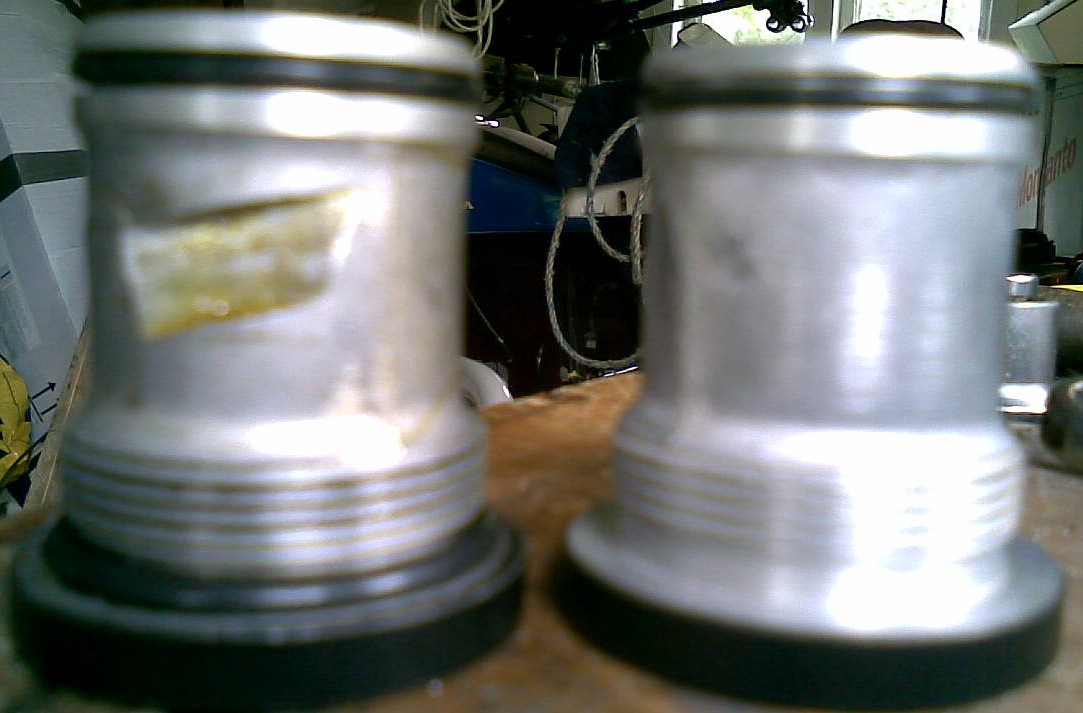 At some point though the tensioner reaches
the end of its travel and then, when the chain stretches just a little more it starts rattling, usually against
the spark plug tunnels (tubes) causing the damage shown at right. The chain can eventually wear a hole in those tunnels which then fill (slowly) with
oil and suddenly the rider notices oil seeping down the side of one cylinder.
At some point though the tensioner reaches
the end of its travel and then, when the chain stretches just a little more it starts rattling, usually against
the spark plug tunnels (tubes) causing the damage shown at right. The chain can eventually wear a hole in those tunnels which then fill (slowly) with
oil and suddenly the rider notices oil seeping down the side of one cylinder.
This particular page and fix actually seems to have created more paranoia than comfort among many Vulcan owners with many suspecting every odd noise might be caused by a loose cam chain so again, if you have a tap or a knock it isn't the cam chain. If you hear a buzzing or slapping sound (remember when your chain was too loose on a bicycle or the drive chain on your old dirt bike) then 'maybe' the extenders have reached their limit.
This procedure will give new life to the extender so you don't have to tear down the entire engine to replace a chain. The part is available through Kawasaki Canada or from Joe Norris who machines them himself.
Before ordering the extender, there is a way to check the cam chain tensioner without removing the entire tensioner and having to reset everything.
Remove the tensioner's cap 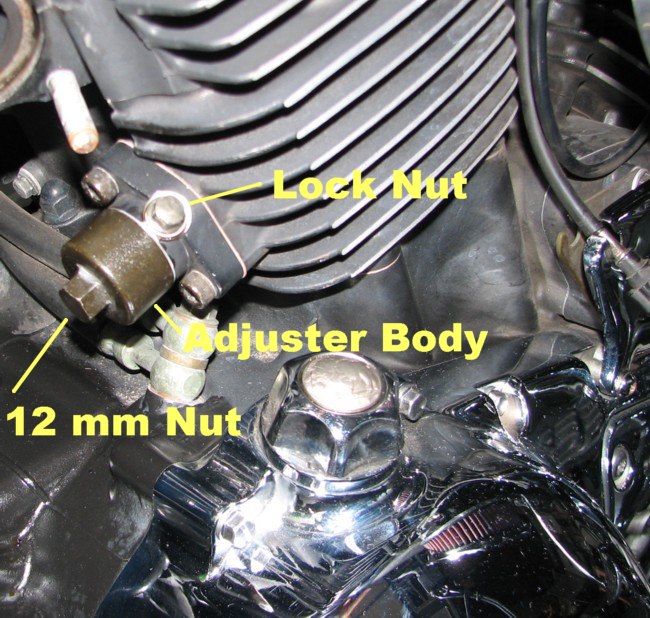 by first loosening the
small 8mm lockbolt on the side of the tensioner body then removing the 12mm bolt on the end of the tensioner body.
Be aware that there are some small parts as shown in the next photo.
by first loosening the
small 8mm lockbolt on the side of the tensioner body then removing the 12mm bolt on the end of the tensioner body.
Be aware that there are some small parts as shown in the next photo. 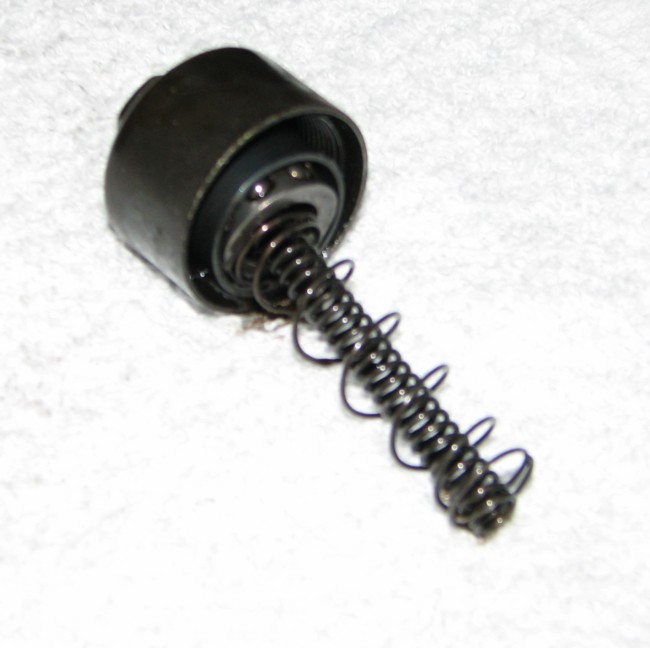 Remove the cap slowly so everything comes apart together in one piece. Be sure to
reinstall parts in the exact order they came out.
Remove the cap slowly so everything comes apart together in one piece. Be sure to
reinstall parts in the exact order they came out.
When the cap/springs/etc. are removed, the extender rod will be somewhere in the following range:
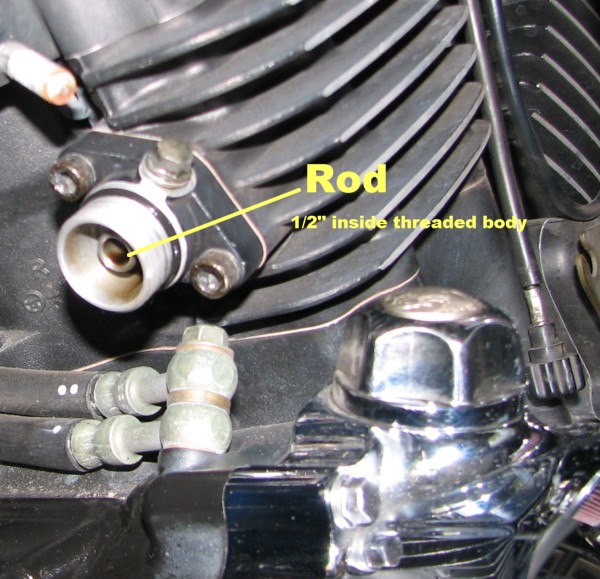 At full retraction, the rod end will stick above
the end of the threaded body by +0.342"
At full retraction, the rod end will stick above
the end of the threaded body by +0.342"
At full extension, the rod end will sink into the body by -0.356" Note the rod shown in the picture at left
is down 'inside' the threaded body by a quarter inch. With only about 1/16" left it's time for replacement.
In other words, if the end of the rod is 5/16" deep inside the body
you can consider yourself OUT OF TRAVEL. On the
other hand,
if the end of the rod is above, or flush with the body's threaded end, you have some travel left and don't need
the extenders.
If measured on the bike, the tensioner body does NOT have to come off, nor do you need to reset the rod, per factory
instructions. If you remove the body, then everything must be re-set according to Kaw's instructions.
If you've decided you 'do' need the extender keep on reading. If not put the cap back on the tensioner
(making sure you replace the other parts in their proper places) and go ride.
What You'll Need
1500/1600 Classic/Nomad cam chain tensioner extenders. In the U.S. the
extenders are being made by Joe (Chuckster) Norris, the price (at this writing,
November 2013) is $20 for the
pair. Contact Joe directly at chuckster1_31@comcast.net
. If you're in Canada you can order the extenders directly from your
Kawasaki dealer (or from Chuck). The Canadian part
number 92027-1500-DE
WARNINGS
Failure to install properly can, and likely will, cause considerable damage to your engine. The following
instructions do not guarantee success, read them over carefully, determine that you really can tackle this project
then proceed at your own risk.
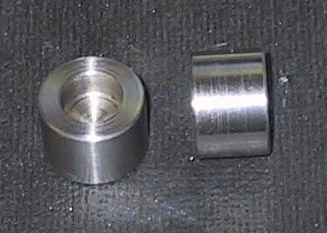
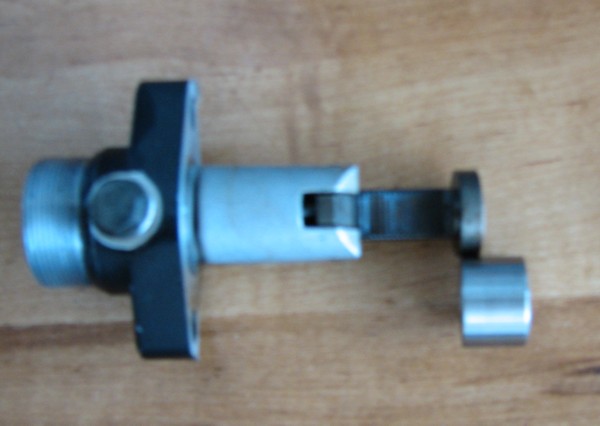 The photo (left) shows the difference between the stock extender (still mounted on rod) and
the new longer unit you'll be replacing it with.
The photo (left) shows the difference between the stock extender (still mounted on rod) and
the new longer unit you'll be replacing it with.
From Kaw's manual:
"This is a non-return type cam chain tensioner. The push rod does not return to its
original position once it moves out to take up camshaft
chain slack. Observe all rules listed below. *When removing the tensioner, do NOT take out the mounting bolts
only
halfway. Retightening the mounting bolts from this position could damage the tensioner and camshaft chain.
Once the bolts are loosened, the
tensioner must be removed and reset as described in "Camshaft Tensioner Installation".
*Do NOT turn over the crankshaft while the tensioner is removed. This could upset the cam timing, and damage
the valves. It's important to KEEP LOCTITE AWAY FROM THE ROD'S TEETH, AND
SEAR/RATCHET AREA.
How To Do It
Removal:
Both front, and rear cylinder's tensioners are identical, however the front one is more difficult to work on. 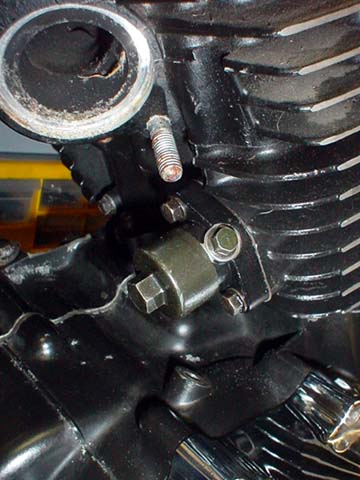
I won't go into the difficulty of accessing the front tensioner assembly, except to say that if you have the original
air cleaner and intake crossover on your bike, there is VERY little room to remove/install the front tensioner.
Those who have replaced the OEM filter with an aftermarket filter, mounted on the right side, will have much less
trouble.
* Loosen lockbolt. (This is a small 8mm hex head on the outside of the tensioner body).
* Remove the tensioner cap. (This is the 12mm hex head on the end of the tensioner assembly)
CAUTION, there are several spring loaded parts inside the cap. When removing the cap,
carefully ease the cap away from the tensioner body, so these parts don't go flying all over the place. Take
note of the order and position of each part to help with proper reassembly.
* Remove the two allen head bolts that hold the tensioner body to the cylinder. There is an O ring
that seals the cap, and a gasket.
The O ring should be reusable, just don't loose it. If you're careful, you can reuse the gasket too. I have
never needed to buy one yet, but if you do, the part number is: 11009-1858. (In a pinch, I suspect that a
thin layer of silicone gasket maker could patch, or replace the gasket).
WARNING!
AT THIS POINT, DO NOT MOVE THE CRANKSHAFT!
* Removal of OEM extender rings from the push rod.
Examine the tensioner body/push rod assembly, and determine how the sear/ratchet mechanism works. 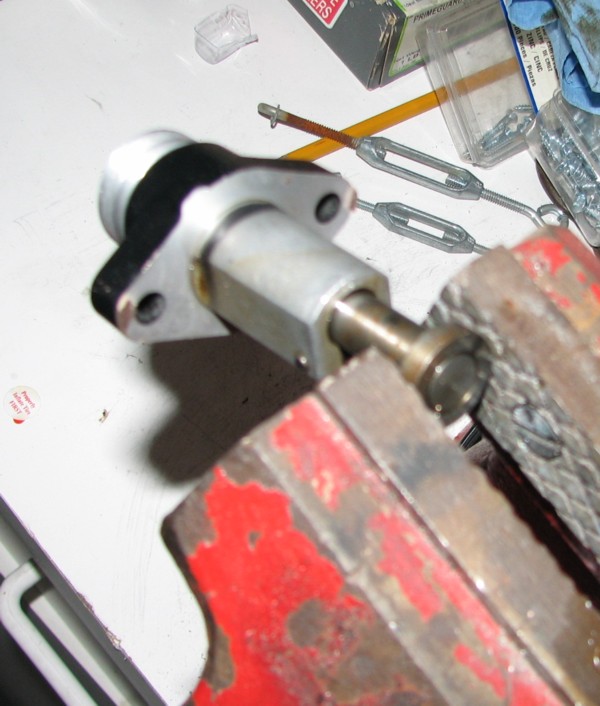 If you push the spring loaded sear towards the gasket surface, you will be able to retract the
push rod into the tensioner body. This will be necessary for reassembly, but for now, just figure out how
it works, and then extend the push rod to it's longest position. The original tensioner ring is pressed onto
the push rod, and must be removed before the new ones can be installed.
If you push the spring loaded sear towards the gasket surface, you will be able to retract the
push rod into the tensioner body. This will be necessary for reassembly, but for now, just figure out how
it works, and then extend the push rod to it's longest position. The original tensioner ring is pressed onto
the push rod, and must be removed before the new ones can be installed. 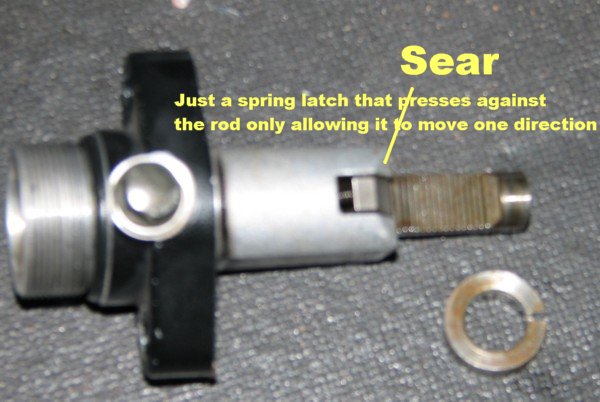 I place the ring in a bench vise, and use a hack saw to cut ALMOST all the way through the ring.
Then use a straight blade screwdriver in the saw cut,and break the ring, then remove. Try not to mark the
push rod itself, or the tensioner body with the saw. .
I place the ring in a bench vise, and use a hack saw to cut ALMOST all the way through the ring.
Then use a straight blade screwdriver in the saw cut,and break the ring, then remove. Try not to mark the
push rod itself, or the tensioner body with the saw. .
* Install the new extenders.
WARNING!
Due to slight variations in push rod diameters, some extenders will slide on easily, while others will be a slight
press. The extender is captive once
installed, but it is possible to drop an extender into the engine while installing it. This could require
engine disassembly to recover it!
BE SURE TO USE LOCTITE.
Use red high temp Loctite (remember the warning above to keep Locktite off
of the sear mechanism and teeth) and slip the new extender in place on the end of the push rod. 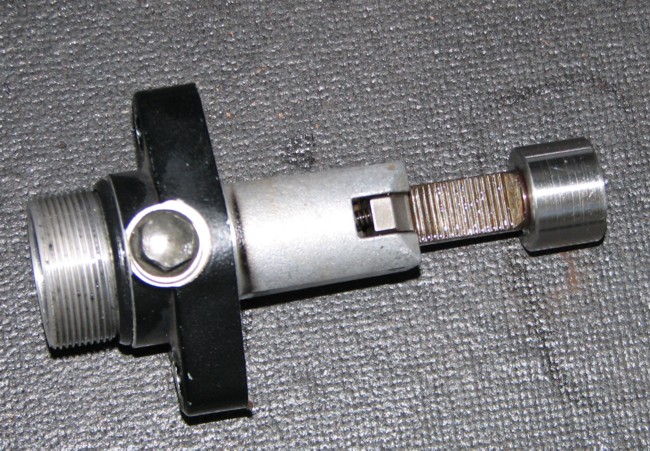 On
some push rods, the extender will slip on easily. On others, it may be necessary to use a lead hammer, or
carefully put the assembly in a bench vise and use the vise to seat the extender.
On
some push rods, the extender will slip on easily. On others, it may be necessary to use a lead hammer, or
carefully put the assembly in a bench vise and use the vise to seat the extender.
** Do NOT apply force to the body, which will damage the sear. Retract the push rod, and only press against
the rod ends. If using a vise, use rags to pad the push rod ends, to prevent damage.
* Prepare the tensioner for reassembly.
Disengage the sear, and retract the rod into the body as far as it will go. Reinstall the large spring, and
the ball 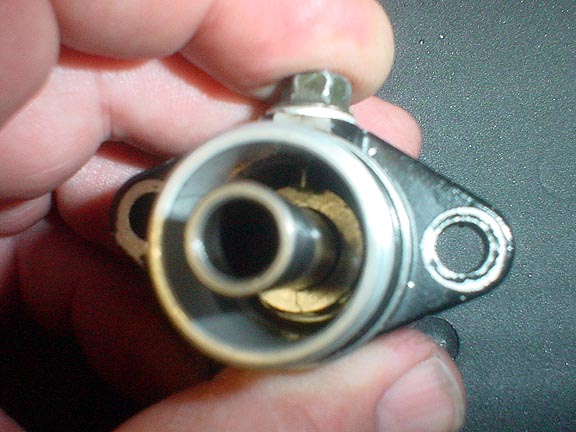 bearing. Compress/bottom the spring/bearing using a small screwdriver, and hand tighten the set screw
to hold everything in place. The set screw does not lock against the side
of the ball bearing cage, but hooks the cage and spring below it in the bottom.
When assembled correctly, it should look like this: Insert
new photo here
bearing. Compress/bottom the spring/bearing using a small screwdriver, and hand tighten the set screw
to hold everything in place. The set screw does not lock against the side
of the ball bearing cage, but hooks the cage and spring below it in the bottom.
When assembled correctly, it should look like this: Insert
new photo here
Install the bearing retainer, which looks like an outer race for the bearing.
* Camshaft Tensioner Installation
Install the body on the engine, while taking care not to bump the push rod, as it will extend.
On some engines, spring resistance will be felt while bolting the body back onto
the engine. One, both, or none of the cylinders may exhibit this slight
spring resistance, depending on where the engine stopped when last shut off. Be
sure the tensioner is as short as possible, and use the mounting bolts to
overcome the slight resistance.
Why does this happen, you say???? The engine has stopped at a place where some
of the valve springs are pushing the cam chain slack to the other side.
This is not a problem, again, just be sure that the assembly is as short as
possible, bolt it on, and torque it. When the engine first turns over, any chain
slack will move to the back, and the tensioner will adjust correctly,
eliminating the slack.
Don't drop
the bearing retainer, which is just slipped on at this point. Use new gaskets/and or silicone, if you want to make
sure of no oil leaks. Torque allen bolts to 87 inch pounds. Once the body is fully seated, push the
tube into the cylinder.
Install the smaller spring, and the end cap. Torque end cap to 14.5 Foot pounds. (20N-m, 2.0kg-m)
Loosen the lockbolt, and back it out a 1/4 inch or so. You should hear a click as the large spring seats.
Tighten the lockbolt to 43 inch pounds.
That's it, you're done!
Rinse, and repeat on the other cylinder.
![]()