Jim's No Drill
Ultra Low Cost Spotlight Mount
Jim MacKenzie

Are you really willing to fork
over more than $100 for a light bar? If the thought gives you pause read
on because Jim has come up with a very inexpensive and simple way to mount fog
or spotlights on the 1500 (and perhaps some other models but not the 1600)
Vulcan. And, as a bonus, you get to use a hammer! Take it away Jim.
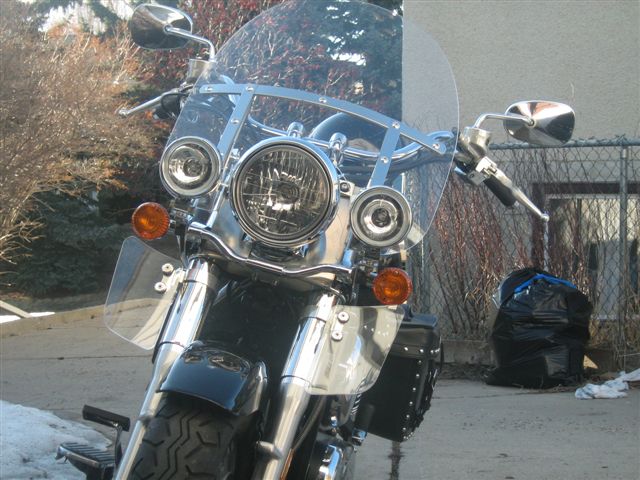
The brackets I made for my lights were
designed so the light bulbs would be in line with the bulb on the headlight
and the front of the lenses would line up with the lens on the headlight.
In other words, if I change the lights and the new housings are different, I
will have to make a new set of brackets if I want everything to line up as
before. (Don't tell anybody, but the lights I used came from an
agricultural supply store and were meant for use on tractors, combines,
etc. Apparently Alberta farmers like to pimp their rides too!)
What You'll Need
2- Spotlights of your choice.
Keep in mind there are different lenses and reflectors to serve different
functions. The most basic are the fog light (with fluted lenses to
disburse the beam. They typically have a short range and sharp cutoff.
Spotlights. They usually have a clear or nearly clear lens and smooth
reflector for a pencil like beam. Of course you can find colored
lenses and hundreds of designs and sizes.
10+ inches of 1/8" aluminum stock 1
1/2" wide.
Optional, wire loom to hide and protect wire from spotlights to power source
Tools: Drill, soft face hammer,
hacksaw, hex keys
First thing to do is buy the spotlights
you want. Dimensions will differ according to the type of light and it's
easier to measure if you have the lights in hand. If you are going to
polish the aluminum bracket, it's easier to do before bending it. Keep in
mind that very little of the bracket will be visible so it's not necessary
to get carried away with buffing and polishing.
Several steps involve clamping,
drilling or bashing aluminum. The material is very soft and easily
scratched, so it's best to use wood in vice jaws, soft faced hammer, etc.
Ready? Read through the following instructions and check out the
photos first just so you know where you're going. Done? Ok, it's
tool time!
1.
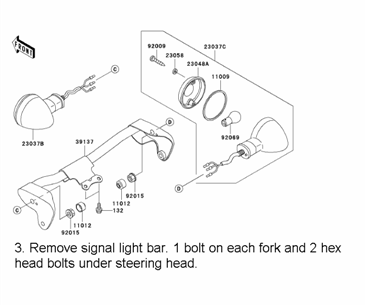
Remove headlight.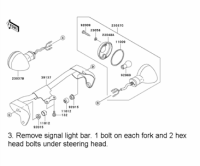
2. Mark signal light wires with masking tape
(L & R) for referrence when re-attaching and then
disconnect the wires.
3. Remove signal light bar. 1 bolt on each
fork and 2 hex head bolts under steering head.
4. Remove signal lights
from bar. (The nuts are hidden under a weather resistant cap.)
5. Re-attach the bar without signal
lights. For now, only attach the hex bolts under the steering head. Finger
tighten only.
6.
 Use a strip of cardboard or thin
plywood to create a template for the aluminum. Bolt the template to the
signal light bar and mark the location
Use a strip of cardboard or thin
plywood to create a template for the aluminum. Bolt the template to the
signal light bar and mark the location
 for the holes to be drilled. The
location of the holes will determine the angle of the bracket. (I used a
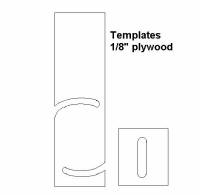
plywood template with slots ( picture left) so I could adjust to the desired angle.) Make
another template about 2x2" (square in photo left) with a slot in the middle for the light mount
bolt. Mount the spotlight to this template and hold it perpendicular to the
first template to get the desired location for the light. When the light is
where you want it, use the base of the template with the light on it to mark
a line on the first template with a felt marker This line will determine
the height of the light and the angle of the base that the light will be
bolted to. This base doesn't have to be horizontal. Mine came out at an
angle that matches the signal light bar. Adjust the light in the second
template to determine how far forward it will be mounted. Measurements
taken with the first template can now be transferred to a clean sheet of
paper (or plywood) to create the final work template (picture right).
for the holes to be drilled. The
location of the holes will determine the angle of the bracket. (I used a
plywood template with slots ( picture left) so I could adjust to the desired angle.) Make
another template about 2x2" (square in photo left) with a slot in the middle for the light mount
bolt. Mount the spotlight to this template and hold it perpendicular to the
first template to get the desired location for the light. When the light is
where you want it, use the base of the template with the light on it to mark
a line on the first template with a felt marker This line will determine
the height of the light and the angle of the base that the light will be
bolted to. This base doesn't have to be horizontal. Mine came out at an
angle that matches the signal light bar. Adjust the light in the second
template to determine how far forward it will be mounted. Measurements
taken with the first template can now be transferred to a clean sheet of
paper (or plywood) to create the final work template (picture right).
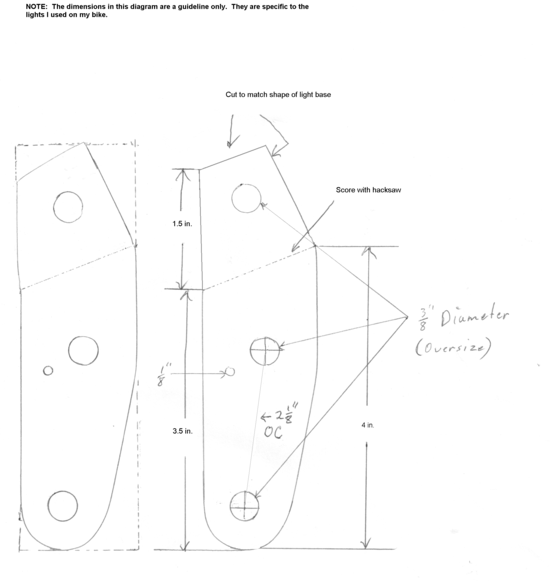
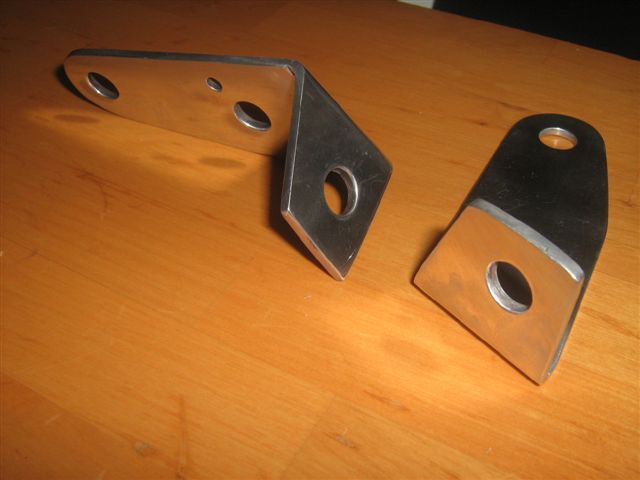
7. Remove the signal light bar.
8. Cut your aluminum into two
separate strips a little longer than demanded by the final template
remembering the bend is going to eat up a little space. Clamp the two pieces of aluminum
together so you only have to drill one set of holes. Using the first
template, drill holes (starting with a small pilot hole) in the aluminum stock. Don't forget the smaller
hole. It keeps the signal lights in place.
9. Use a hacksaw to score along the
felt marker line about 1/16" deep. This will make it easier to bend the
aluminum in a straight line.
10. Sandwich the aluminum (one piece
at a time, you're making mirror copies) between two pieces of thin plywood
and insert into a vice so that the scored line lines up with the jaws of the
vice. Use a plastic hammer to tap a 90 degree bend at the score line.
11.
Using the second template, drill a
hole on the top of the bracket you just made for the light bolt.
12. Use a hacksaw to cut to desired
shape. File, sand, polish, etc. as desired.
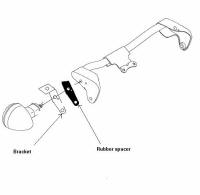
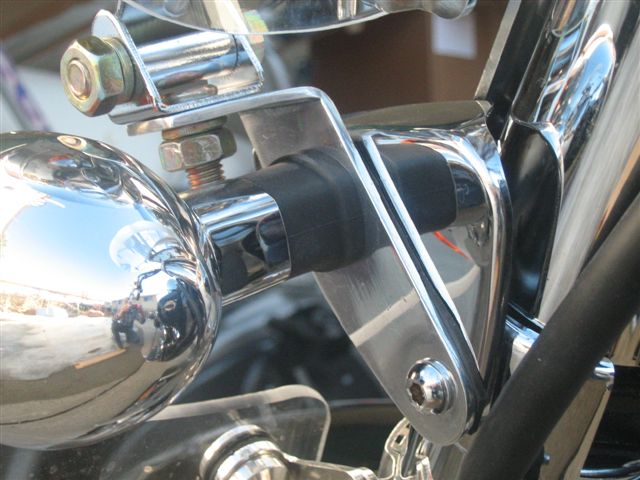
13. Re-attach the signal lights to the
signal light bar by passing the signal light bolt through the
bracket and
into the signal light bar. Make sure the small stud on the signal light
base goes into the proper hole. Run the wires through the nut and the water
resistant cap and tighten the nut. *OPTIONAL: You may want to make a
rubber grommet (photo right) from an old bicycle inner tube to prevent the bracket from scatching the signal light bar.
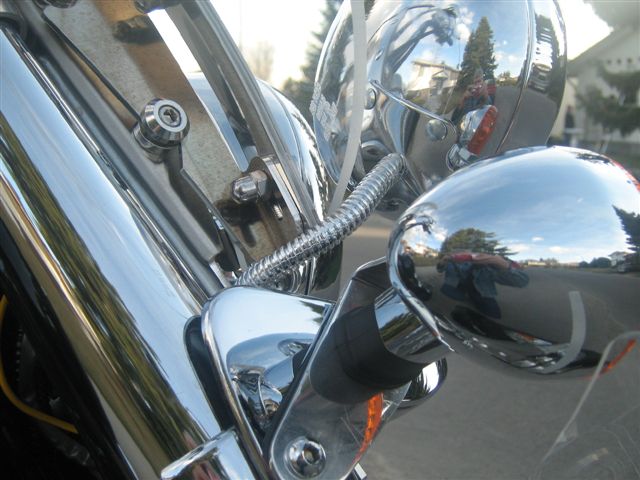
14. Re-attach the signal light bar
(photo left) to
the bike and hook up the signal light wires.
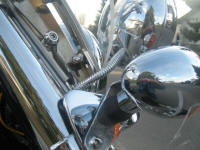
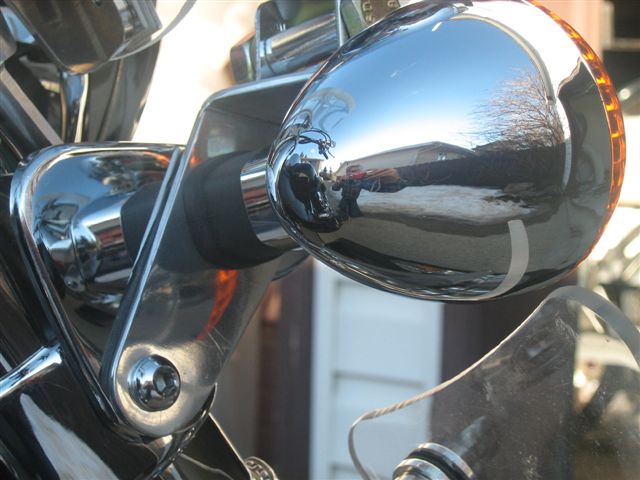
15. Bolt the spotlights to the
brackets (picture right). Be careful of the length of the bolts. It's possible they might
be too long to secure the lights without interfering with the signal light
stem. That was the
case with my lights. The solution was simple: The
hacksaw.
16. Re-install headlight.
17.
 Tidy up. This is obviously optional but if you're going to all the
trouble to create a great looking spotlight mount you don't want a bunch of
ugly wiring hanging out of the housings. Most auto supply stores carry
a wire loom product that comes in various colors including -- chrome!
Tidy up. This is obviously optional but if you're going to all the
trouble to create a great looking spotlight mount you don't want a bunch of
ugly wiring hanging out of the housings. Most auto supply stores carry
a wire loom product that comes in various colors including -- chrome!
18. Now that the spots are mounted
you'll need to power them up. Check
this Gadget page for simple instructions that'll protect the rest of
your stock bike wiring.
19. Aim your new spotlights.
Instructions are posted on this Gadget
page.
18. Go ride!

 Use a strip of cardboard or thin
plywood to create a template for the aluminum. Bolt the template to the
signal light bar and mark the location
Use a strip of cardboard or thin
plywood to create a template for the aluminum. Bolt the template to the
signal light bar and mark the location
 for the holes to be drilled. The
location of the holes will determine the angle of the bracket. (I used a
plywood template with slots ( picture left) so I could adjust to the desired angle.) Make
another template about 2x2" (square in photo left) with a slot in the middle for the light mount
bolt. Mount the spotlight to this template and hold it perpendicular to the
first template to get the desired location for the light. When the light is
where you want it, use the base of the template with the light on it to mark
a line on the first template with a felt marker This line will determine
the height of the light and the angle of the base that the light will be
bolted to. This base doesn't have to be horizontal. Mine came out at an
angle that matches the signal light bar. Adjust the light in the second
template to determine how far forward it will be mounted. Measurements
taken with the first template can now be transferred to a clean sheet of
paper (or plywood) to create the final work template (picture right).
for the holes to be drilled. The
location of the holes will determine the angle of the bracket. (I used a
plywood template with slots ( picture left) so I could adjust to the desired angle.) Make
another template about 2x2" (square in photo left) with a slot in the middle for the light mount
bolt. Mount the spotlight to this template and hold it perpendicular to the
first template to get the desired location for the light. When the light is
where you want it, use the base of the template with the light on it to mark
a line on the first template with a felt marker This line will determine
the height of the light and the angle of the base that the light will be
bolted to. This base doesn't have to be horizontal. Mine came out at an
angle that matches the signal light bar. Adjust the light in the second
template to determine how far forward it will be mounted. Measurements
taken with the first template can now be transferred to a clean sheet of
paper (or plywood) to create the final work template (picture right).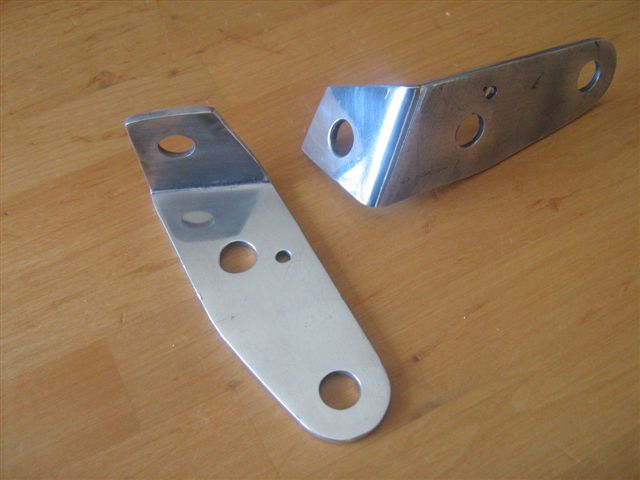

 Tidy up. This is obviously optional but if you're going to all the
trouble to create a great looking spotlight mount you don't want a bunch of
ugly wiring hanging out of the housings. Most auto supply stores carry
a wire loom product that comes in various colors including -- chrome!
Tidy up. This is obviously optional but if you're going to all the
trouble to create a great looking spotlight mount you don't want a bunch of
ugly wiring hanging out of the housings. Most auto supply stores carry
a wire loom product that comes in various colors including -- chrome!