Ok I know Progressive dose not make springs for the Fuel Injected
Nomad because its a cartridge fork system. Well I figured out how to install them. The results are great. The
install is a little more difficult then the regular non-cartridge system but its not too difficult. Id say install
time is about 2 hours including some down time while draining springs and forks.
Parts Needed:
Progressive 11-1145 Springs with a 1 Spacer
Tools I used are as follows:
Small Flathead screwdriver
3-½ ton floor jack, or any jack that will
safely lift the front tire at least 10 off the ground.
17 mm Allen wrench or 17 mm nut and a 17 mm socket
wrench
Air impact wrench, Just makes removing the fork
seal caps a lot easier
6 mm Allen wrench
8 mm Allen wrench
14 mm open end wrench
12 mm socket
Torque Wrench
Bar Clamp
Ratchet tie down
Masking Tape or electrical tape
1 Qt 15w Fork Oil
Light gauge wire (18-22) about 7 feet
Small tape measure
2 Moving blankets
Before starting this job you may want to purchase
2 sets of brake pads for the front brakes, as its a good time to replace them if needed.
Start by covering your tank and front fender
with blankets
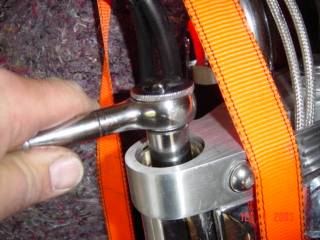
Remove dust caps with small flathead screwdriver
Brake Loose the fork caps with a 17 mm Allen wrench dont remove them yet just brake the seal, our use a 17 mm nut in a 17 mm socket with a spacer behind it so it sticks ½ way out of the socket. I used an air impact wrench to brake them loose.
Loosen the 6 mm Allen bolts that clamp the top triple tree to the fork
tubes.
Loosen the 8 mm Allen bolts that clamp the bottom triple tree to the
fork tubes
Remove the brake cylinders from both sides with a 12 mm socket, swing
them over the front crash bar out of the way.
Disconnect the speedometer cable (if you have one) from the wheel.
Jack up the front-end letting the forks slide out of the triple tree
Unscrew the fork caps from the tubes, then using
a 14 mm open-end wrench on the cartridge rod locknut and the 17 mm Allen wrench on the fork cap, remove the fork
cap from the cartridge rod.
Remove the stock springs.
Tip the forks down and drain them into a pan or plastic jugs, let drain
for about 5 min.
Turn forks back upright and add about 5 oz of
new fork oil to each tube. Pump the cartridge rod up and down several times in each fork to flush out the old oil
in the bottom of the cartridge. Drain tubes again.
With the tubes upright and vertical and inserting a tape measure 5 ½
inches into the fork add new fork oil until it comes up to the bottom of the tape measure. Repeat in the other
tube.
Lift the cartridge rods up and tie about 3 ½ feet of wire to each
rod just below the 14 mm locking nut. Wind up the wire and loosely stuff it in the top of the fork tubes.
Reinstall the forks into the triple trees, tighten up the bottom 8 mm
tree clamps and the top 6 mm tree clamps.
Cover the top triple tree with tape around the tube holes to avoid scratching
the tree.
 Pull the loose end of the wires tied to the cartridge rods up through the new
springs, then the washer, then the spacer.
Pull the loose end of the wires tied to the cartridge rods up through the new
springs, then the washer, then the spacer.
 With the forks fully extended install a bar clamp from the underside of the
bottom triple tree to the top side of the top triple tree, on the top tree cover the edge of the fork hole with
the clamp and tighten the clamp. This will compress the spring and allow you to attach the fork cap to the connecting
rod in the next step.
With the forks fully extended install a bar clamp from the underside of the
bottom triple tree to the top side of the top triple tree, on the top tree cover the edge of the fork hole with
the clamp and tighten the clamp. This will compress the spring and allow you to attach the fork cap to the connecting
rod in the next step.
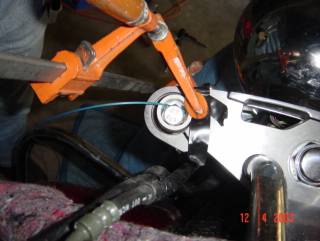
Now install a ratchet tie down, attach the tie down hook to the disk
brake disk, now run the strap over the handlebars and attach the other hook back down to the disc. Tighten the
tie down, this will compress the front end, compress it till it is close to bottoming out make sure the spring
spacer is being held down by the bar clamp.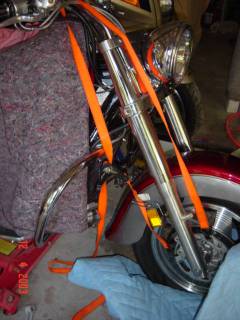
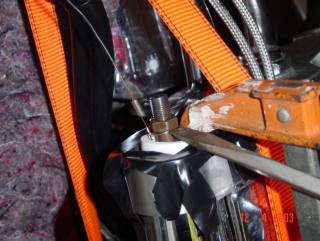 Once compressed you can Slowly use the wire
to pull the cartridge rod up through the washer and spacer. You may need to use a flat head screwdriver to work
the connecting rod lock nut through the washer.
Once compressed you can Slowly use the wire
to pull the cartridge rod up through the washer and spacer. You may need to use a flat head screwdriver to work
the connecting rod lock nut through the washer.
Screw the fork cap to the connecting rod. Now
use a 14 mm open-end wrench and the 17 mm Allen wrench to tighten the lock nut to the connecting rod.
Now remove the wire used to lift the rod. Release
and remove the barclamp
Slowly release the tie down allowing the forks to fully extend.
Remove the tape.
The cap should now be in the top of the tube,
ready to screw in with the 17 mm Allen wrench, if so do it, if they are sitting just on the edge of the tube, give
the cap a tap with a rubber mallet, it should slip into place, then tighten it.
If your going to change your front brake pads, now is a good time to do it, then reinstall brake cylinders and tighten bolts to 24 ft lbs.
Reinstall speedometer cable if you have one,
and let jack down.
Reinstall plastic chrome fork tube cap covers
Loosen Allen bolts on top and bottom triple trees
and make sure forks are even in height, both of the plastic chrome fork cap covers should extend a little above
the top triple tree. At this point I use a rubber mallet to hit the top of the triple tree a few times to make
sure the fork tubes are set all the way up in the triple tree.
Tighten top and bottom Allen bolts on triple
tree clamps.
Pump front brake lever to bring brakes back up.
Check all bolts to make sure theyre tight.
Remove blankets.
Check everything again.
Put on protective gear including helmet for test
ride
..Always a good ideal after working on any critical components like brakes, wheels etc. to where more protection
than usual in case something was missed or done wrong.
Im not a professional wrench, just a shade tree
guy. If you decide to use these directions please be advised I may not know what the heck Im talking about and
do the procedure entirely at your own risk like I have. I hope this process works for you, if you try it let me
know how it went.
Big Al deCoudres
VROC # 4500
allaire@TXUCOM.NET